Vancouver Island outdoorsman Theo Dombrowski loves exploring the trails of the Island, and he has put his knowledge into two new guidebooks to entice others to share his passion. This week, we feature an excerpt from Popular Day Hikes 4: Vancouver Island, published by Rocky Mountain Books. Next week, we’ll have an excerpt from Seaside Walks on Vancouver Island.
MAPLE MOUNTAIN
11.4-kilometre partial loop
High point: 505 m
Height gain: 306 m (plus many small ups and downs)
Difficulty: Moderate
All season (though there may be snow at the top in winter)
From Highway 1, almost four kilometres north of downtown Duncan, turn right onto Herd Road. After 5.8 km, when you see the sign for the Crofton ferry, turn left onto Osborne Bay Road for 3.5 km. Turn right onto Chilco Road and follow it to the turnaround at its end. (Don't be put off by the “No Exit” sign.) Park so as not to block the yellow gate, which is usually locked.
Difficulty: This is a safe but generally narrow path with no exposure. It can require careful footing on some sections of irregular rock outcroppings and along stretches that are slippery with mud and moss during the winter or after heavy rains.
The route:
1. Walk past the yellow gate barring the gravel road until you see a blue “Trail” sign on the right pointing to the left along an old roadbed. On your left you will see another blue trail sign and several splashes of blue paint on tree trunks. You will be following this “blue trail” for a few kilometres as it roughly parallels the shoreline and gradually approaches it.
2. Very quickly you will come to a dirt road. Turn right and, a few steps along, take a right fork, following a blue sign and a rough placard saying “To Cross.” In two minutes you will come to the beginning of the trail proper and a sign warning that you are entering a Municipal Forest Reserve and should watch for unmarked hazards. The next section of the trail dips and rises through some stands of large cedars and swordferns across some small ravines and streambeds.
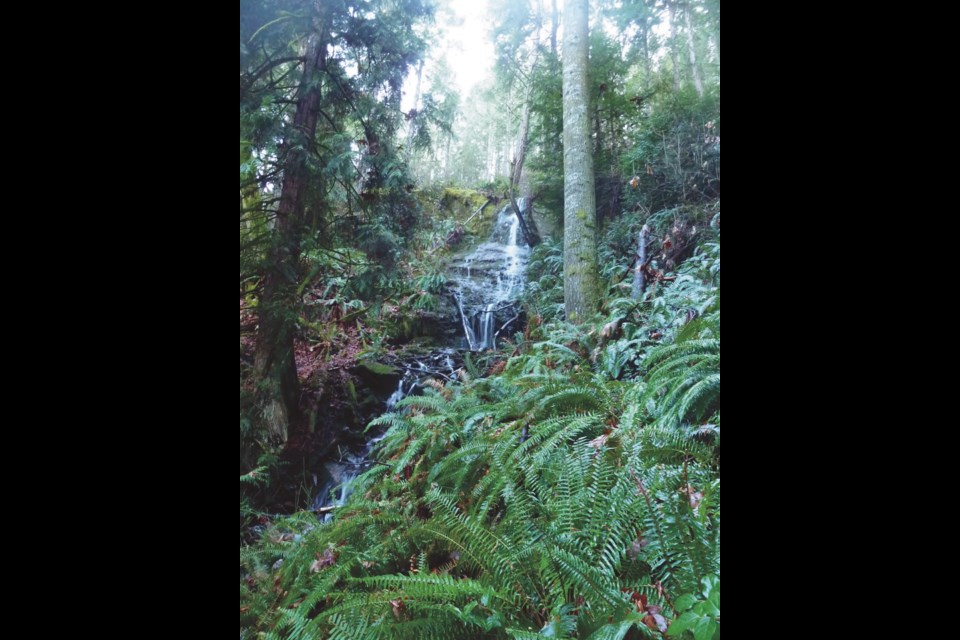
3. You will come to a photogenic log bridge and small cascading falls just before a junction with the “yellow” trail leading off to your left. Go straight ahead on the “blue” trail. Along this section you will ascend to about 230 m, then begin descending, partly by way of some switchbacking trails with some viewpoints from a mossy bluff. One of these has a rough religious cross.
4. When, much later, you come to a four-way intersection, turn right to join a path marked with pink ribbon. The trail angles fairly steeply uphill along an old track. Ignore a tempting-looking trail marked with pink ribbon and branching off to the right. Carry on straight ahead up the old track, where you will soon pick up more pink ribbon. You will also soon see that that right-hand fork you didn't take now rejoins your route, but over a largely collapsed log bridge.
5. After a considerable uphill section, you will come to a broad service road (370 m). After a few steps along this road you will see the clearly marked “pink” trail entering the forest. Ascending another 100 m over the next section will bring you again to the service road. Note where the pink-ribboned trail swings back into the trees; but to reach the summit viewpoint, leave the trail and head along the service road for about 100 m.
6. After enjoying the view from this end of your walk, return to the point where the pink-ribboned trail enters the trees, and descend fairly steeply to a junction with the “blue” trail. The junction is a little confusing because there are two spots where you can turn left to begin contouring back northward. In fact, however, these two options are only a few metres apart (though not visible simultaneously) and both converge.
7. The “blue” route - back to the point where you left it to climb to the summit via the “pink” trail - is mostly clear and straightforward, though it does require a little care at a couple of narrow rocky spots. In addition you will encounter one place just before the intersection with the “pink” trail where an older, clearly disused version of the “blue” trail drops away to the right. It is actually usable, but not as good as the newer version. Both converge after a short distance.
8. Having reached the intersection with the “pink” route, carry on straight ahead to return the way you came.
Option:
If you want variety on your return and are happy to add about a kilometre to the overall distance, you can turn right at this last intersection to carry on downhill a short way and pick up the “yellow” trail (actually yellow-green at some points) on your left. The “yellow” trail is fairly rough in places and can be indistinct when it crosses open bluffs, but it does give some beautiful, open views. At three points you can descend fairly easily to little stony pocket beaches. As the path swings away from the water it crosses a broad track that might be mistaken for the through route. Cross this wide track and pick up the yellow flagging to keep on the route until you rejoin the “blue” trail just before the log bridge. Most of this hike is described in more detail in the companion volume, Seaside Walks on Vancouver Island.
Excerpt from Popular Day Hikes 4: Vancouver Island, by Theo Dombrowski, Rocky Mountain Books.
Theo Dombrowski is an artist, writer, kayaker, hiker, mountain biker and skier. He worked in international education for most of his career, primarily at Lester Pearson College. He donates some of the profits from his book projects to charity, principally the Georgia Strait Alliance and Médecins sans frontières International. He lives in Nanoose Bay.