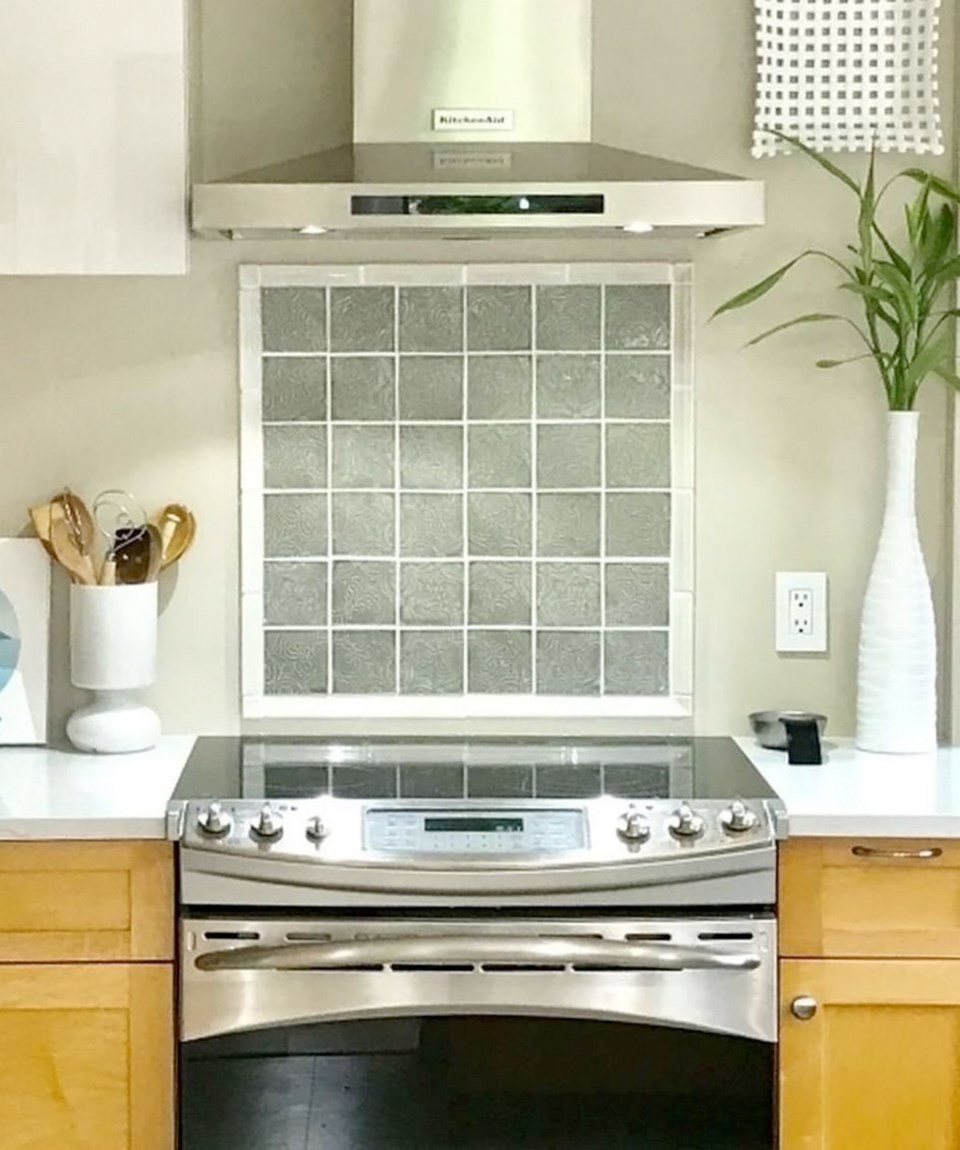
Dear Debbie: In our kitchen, we applied beautiful, handmade Spanish tiles as a framed backsplash behind the stove top. We were required to use larger grout lines to accommodate the individuality of each tile. The tiles are grey. We are wondering if we should have used matching grey grout instead of white.
Shana
The embossed tiles that you chose make an impressive backsplash — the tile frame adds to its handmade appeal. White against grey establishes the grid pattern clearly as well as showing the slight irregularities that make the handmade tiles special.
You have a palette of white and grey in your kitchen that complements the honey-coloured wood cabinets. By painting the grout grey, the tiles will lose some of their individuality and be viewed more as a block of colour.
Why not tape over the grout to see the effect before you paint?
Dear Debbie: We like the white tiles in our bathroom shower, but we can't get the grout clean. It looks horrible. We were thinking about putting new grout over the old in a contrasting colour, dark blue. Can this be done?
Eric
Mildew, mould and other stains on tile grout are a very common problem, There are cleaning methods that will work, but you may decide to replace the grout. I don’t recommend applying new over old. The new application will be thin and uneven.
Purchase a grout saw, which is a tool that makes removing the old grout simple. Cut along the grout lines, then clear out the grooves with a brush. There’s a variety of colours in premixed grout or mix yourself. The blue grout is a fine choice that you can complement with towels and bath accessories.
Dear Debbie: I did a painting project years ago in my living room. The flat colour was put on walls and ceiling and then the walls were measured off into stripes. Alternating stripes were painted over with a clear lacquer. Also the entire ceiling was lacquered over a faux finish. What do I need to do to cover those shiny, slick, lacquered areas?
Katherine
You bring up important challenges. Creating stripes with paint and/or varnish is a fun decorating project and the results vary from kid-friendly colours to the classic striped patterns that evoke Victorian wallpapers. Fat stripes applied in pale greys or whites have a contemporary feel and changing direction to horizontal can make a room feel larger.
Time for a change? Whether you have used two or more shades of paint, or created the striped effect with varnish, there will be raised fine lines that separate the stripes. When you wish to switch back to a solid, flat surface, steps must be taken to remove these lines.
Prepare your surfaces for paint by priming your walls and ceiling with a good-quality, high- hide primer/sealer that is designed to cover slippery (lacquered) surfaces. That will take care of the glossy varnish on the ceiling and the walls. Let dry completely.
You will now be able to see any areas that need to be repaired and/or sanded smooth. If the ridges between stripes are too pronounced or numerous, apply a skim coat of drywall compound. Let dry, sand again and prime over the repairs.
You have now a solid, sealed base and can apply your fresh paint.
Written by Debbie Travis and Barbara Dingle. Email decorating questions to house2home@debbietravis.com and follow Debbie at debbietravis.com.


